Friday, May 17, 2013

Ravioli/Cannelloni/Conchiglioni Filling + Ravioli Making!


This is delicious stuffed in any kind of pasta. Recently I've started making my own buckwheat ravioli (pictures follow). I've been using the recipe from Nonna's Italian Kitchen for the pasta, which I won't repost because I haven't modified it, so it's not really mine.

The ravioli filling, however, has been developed by simple trial and error. All of these measurements are approximate. I am a big fan of adding things to taste!

1 459 g block medium tofu, mashed
1/2 cup ground blanched almonds
1/4 cup ground walnuts
1/4 cup nutritional yeast
1/4 cup dry white wine
1 tbsp tahini
1 tbsp shiro (aka white/yellow) miso
2 tsp dried parsley
3 tsp each dried basil and thyme
1 1/2 tsp onion powder
freshly ground black pepper
canola oil for sauteing
10 brown mushrooms, finely chopped (I use food processor)
4 cloves of garlic, finely chopped (I use food processor)
bread crumbs, as needed

Saute garlic and mushrooms on medium heat in oil until most of water is gone from mushrooms. Mix mushrooms and garlic together with all other ingredients except bread crumbs. Mix in bread crumbs as needed to get desired consistency. Especially in ravioli, it helps to have thicker filling that will form a ball that stays together while you work with the pasta, rather than falling all over the place and making the fresh pasta soggy. The filling used in the photos below doesn't actually correspond with the recipe here. It is a chard, mushroom and walnut filling, which was ok, but not as good as the mushroom/yummy tofu stuff. It also was a bit wet and hard to fit in the ravioli without getting bits of it everywhere/in the dough, which can result in holes in your ravioli. Perhaps would have helped to add bread crumbs to the chard filling, and also to food process the chard to almost a paste.

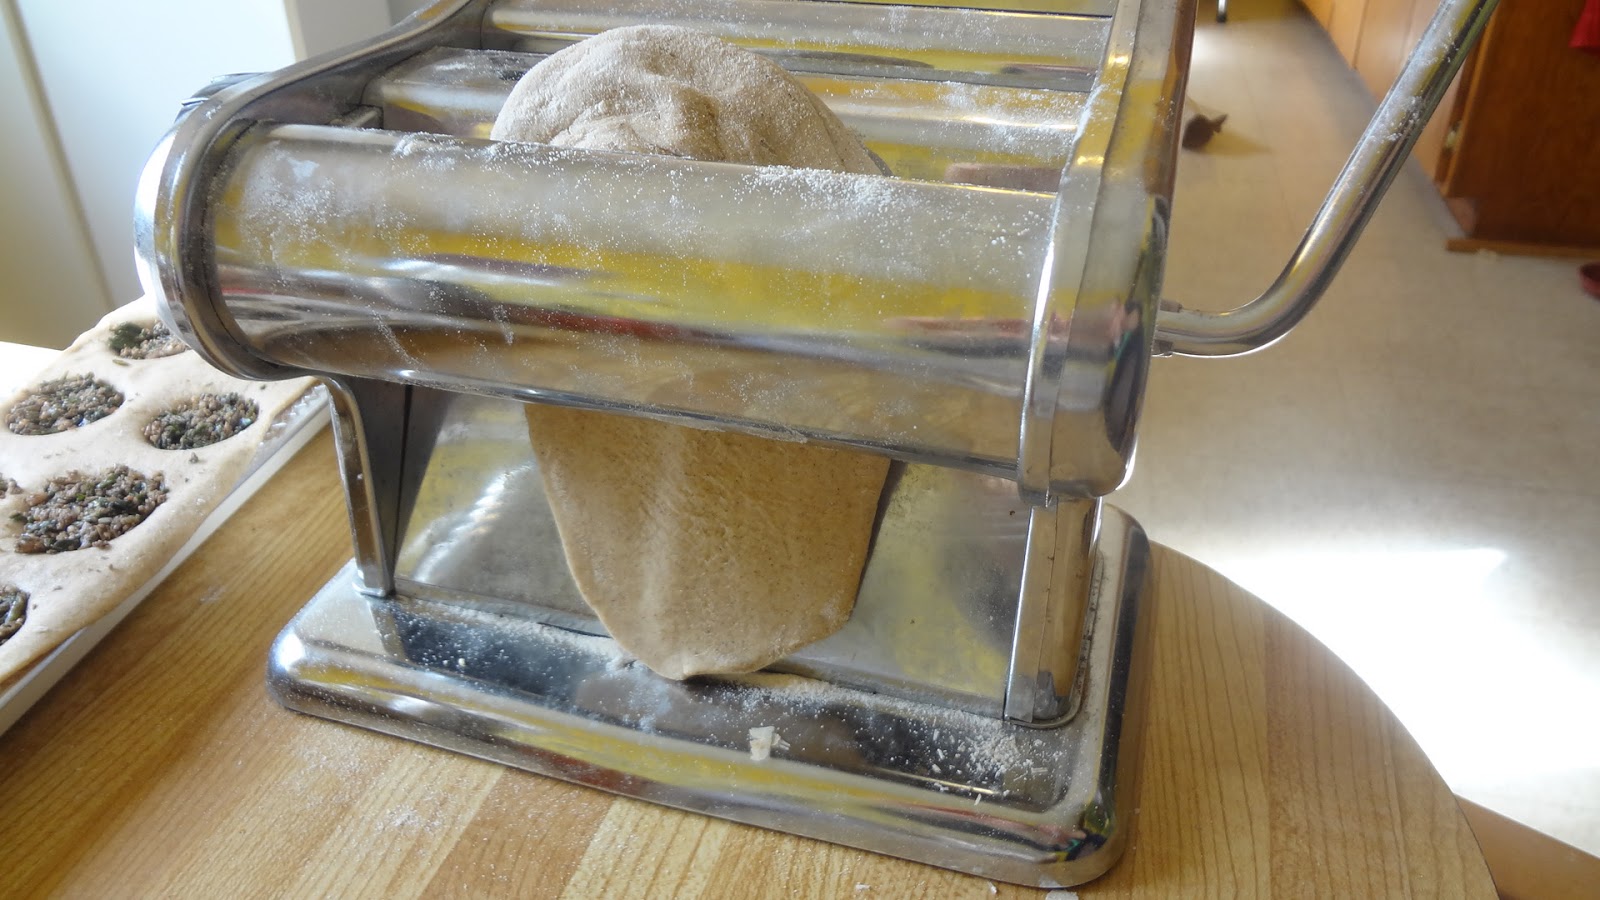
Here are pictures of the ravioli making process. I found this a bit tricky. I used an old hand-crank pasta machine. In Nonna's Italian Kitchen, Grogan says to divide the dough into 8ths to roll out, but I find that too little for my ravioli mould. 6ths was more like it. Roll your portion of dough into a ball, flatten ball slightly, then flour it and run through the machine (setting 3 on my machine the first time through) then fold like a letter and run through again (setting 7 on my machine - I did mine a bit thicker than Grogan recommended to help prevent tearing. Plus, I love me some dough). The mould I used came with a small rolling pin that presumably you're supposed to use to seal the ravioli. I found it just stuck to the dough, so doing by hand worked better. I also greased and floured the mold for easy removal of the completed sheet of ravioli. The easiest way to remove it was to gently work my fingers between the dough and the mould, with the mould inverted so the sheet of ravioli landed on the table as it came loose. My ravioli weren't the most attractive. I think perhaps you're supposed to use a serrated/zigzag cutter to cut them apart (which would match up to the impressions the mold makes on the ravioli sheet) but since I only have a regular pizza cutter, that's what I used. Still tastes the same: delicious!

Run a flattened ball of dough through the machine...
 
Fold it like a letter and run it through again to make a sheet...
Stretch sheet gently over the ravioli mold. Put a tsp of filling into each indentation...


Roll out a second ball of dough, fold, and repeat. Lay over top of the filled bottom sheet of pasta...

Pinch around each ravioli, by feeling for where the edges of the mold are. Cut off any extra dough...
Gently remove the sheet of ravioli...

Ready to cook or freeze. Boil for about 3 minutes...

Topped with home-made tomato sauce, vegan parmesan and olives. Yum!


Best Fudgey Brownies with Lavender Frosting

I've made lots of brownie recipes over the years. These originally came from a kid's cookbook, and they were the first brownies I ever made. I have re-made this recipe several times over since. I think the original recipe paired them with chocolate frosting, which is also a solid option. I made these for company the other day, and was asked for the recipe, so it occurred to me I should post it.

Brownies
1/2 cup coconut oil
1 cup semi-sweet dark chocolate chips
2 tbsp freshly ground flax seed (use a coffee grinder to get them fine)
1/4 cup packed brown sugar
1 tsp natural vanilla extract
1/4 cup water
1 cup semi-sifted stone ground whole wheat flour (or whole wheat pastry flour)
1/2 cup chopped nuts (optional)

- Preheat oven to 350 F
- Grease an 8x8 square pan
- Melt chocolate chips and coconut oil together. I do this by putting them in the microwave on the defrost setting for 30 second intervals, stirring in-between until liquid. Chocolate burns easily! Once melted, set aside to let it cool.
-  In a large bowl, beat together flax, water, sugar and vanilla. Add chocolate mixture and beat together. Carefully stir in flour and nuts. Mix until flour is fully incorporated, but do not overmix.
- Bake for 25 minutes or until toothpick inserted in centre comes out clean
- Cool completely before frosting

Lavender Frosting
1 tbsp dried culinary lavender (could also use lavender tea)
1/4 cup soy or almond milk
1/4 cup fairly firm margarine (such as Earth Balance) softened
2 1/2 - 3 cups of powdered sugar
Food colouring (blue and red/purple) as desired - Apparently you can use cabbage for purple colouring. I should try sometime.
Finely ground culinary lavender, to taste (optional)

Heat the milk until it is steaming (microwave for 30 seconds works well). Put lavender in the milk and steep for 10 minutes. The milk will turn a bit purple or greyish from the lavender. Mix margarine and 2 cups powdered sugar. Add lavender milk, straining out lavender through a sieve. Mix frosting, adding sugar as needed until desired consistency for spreading (it will firm up a bit too when chilled). If you want a particularly strong lavender flavour, you can also grind dried lavender flowers in a coffee grinder and mix these in with the frosting as well. I like mine strong so I do this. I also add food colouring at the end because the lavender sometimes turns the frosting a greyish purple off-white which I don't find appetizing! Chill frosting.

When the brownies are cooled, frost with lavender frosting. Cut into squares. For extra fudgey brownies, chill before serving.


Garlic Dill Salad Dressing/Dip

I just invented this dressing at lunch. It's delish. The measurements are approximate since I just winged it to taste. It comes out quite thick, so would work well for a dip as well.

Home made salad dressings are always WAY better than store bought, and take almost no time to whip up. This one makes about 1/2 cup.

1 tbsp honey/agave
2-3 tbsp tahini
1 tbsp avacado oil (avacado oil is expensive but delicious. You could also use olive or whatever you have).
2 tbsp apple cider vinegar
3 tsp dijon mustard
2-3 tsp nutritional yeast 
1 tsp dried dill
2 tsp dried parsley
1 clove fresh garlic
pinch of salt

Put all ingredients in a bullet blender (I used a mason jar attached to my Oster blender base - if you have an Oster - this works well). You can also chop the garlic finely and shake all contents in a jar until mixed.

I used this to dress a salad made of things I had in the house: spinach, romaine, onion sprouts, shredded carrot, chopped brown mushrooms, chopped celery, canned chick peas.

Friday, August 24, 2012

Stuffed Zucchini


This recipe is very roughly based on a stuffed eggplant recipe in my mum's old Joy of Cooking. I ended up with extra filling, but it's delicious and would go well in peppers or mushrooms. If my zucchinis look strange in this picture it's because I somehow grew teardrop shaped zucchinis. I am a gardening novice so please don't ask me how that happened! Corn is from my garden. It also turned out strange. Like gardener like garden?

Ingredients:
• 1-2 tsp canola oil
• 1 onion
• 2 zucchinis (or more, or less, depending on size of zucchinis)
• one tomato
• 5 brown mushrooms
• 1/4 yellow bell pepper
• 4 garlic cloves
• 1/2 jalapeno (or more, if you like heat)
• 1 tsp vegetarian chicken broth powder
• 1/2 cup cooked brown rice
• 1 tsp veg Worcestershire sauce
• 5 strips tempeh bacon (store bought) or tofu bacon
to taste:
• Greek seasoning
• oregano
• cumin

• 2 tbsp+ bread crumbs
• a bit of shredded soy cheese (optional)

Prep:

Preheat oven to 350 F. Chop up the onion and fry on medium heat in the oil until it begins to brown. Make sure to stir onion periodically. Put the tempeh bacon on to fry in a separate pan, flipping to brown each side. If you are making tofu bacon, you will also need to add the bacon seasoning following browning. When the bacon is done, take it off heat, cut into bits and set aside. While onion and bacon is cooking, use an ice cream scoop or strong spoon to hollow out the inside of the zucchini, leaving about 1/2 inch wall thickness. Chop zucchini innards and set aside in a bowl. Chop the tomato, mushrooms, jalapeno, and garlic, and add to zucchini in bowl. When onion lightly browned, add all the other veggies from the bowl, the brown rice, the seasonings, and the tempeh bacon into the pan. Continue to stir until medium heat until veggies are just cooked (they will get some cooking time in the oven as well). Take the mixture off heat, and add in bread crumbs as needed to thicken. They should help the mixture stick together so it doesn't fall out of the zucchini. Stuff each zucchini. Filling can be overflowing out of the zucchini: pack it in there! Top with veg cheese if desired. Bake for 20 minutes in a casserole dish with a little bit of water in it.

Monday, August 20, 2012

Peppercorn Ranch Kale Chips

I made this up out of a bunch of ranch dressing and kale chip recipes. They're dehydrating in the oven right now, but I tried a few raw and they were delish. The herbs can be either fresh or dried. What's listed here reflects what I had! I did this to taste so measurements are approximate

8 very large fresh leaves of kale

1 cup raw cashews, soaked at least two hours in cold water (I did them overnight) and drained
2 tbsp apple cider vinegar
1 tbsp lemon juice
1-2 tsp whole black peppercorns
tops from 1 large spring onion, chopped (chives would also probably be good)
1/2 clove garlic
2 tsp dried thyme
2 sprigs chopped fresh parsley
1/4 tsp dried dill
4 leaves fresh basil

Wash kale and shake leaves dry (or use a salad spinner if you have one). Remove stems of kale and break into chip-sized pieces in a very large bowl.

Put all seasoning ingredients in a blender or food processor. Process on low, adding water or almond milk by tablespoonfuls as needed to help mix. The seasoning mix should be a fully-blended thick creamy paste, more like a nut butter consistency than a dip, when you are finished.

Use a spatula to scrape all the seasoning mix into the bowl with the kale. Massage the seasoning over the kale leaves, trying to cover all surfaces and avoid clumps of seasoning (which are delicious, but may deprive some kale leaves of having any seasoning!)

Spread leaves out onto parchment or silicone mat-covered baking sheets. If the leaves are too thickly layered, or clumped up, they will not dry as efficiently and you will end up with wet spots. A double layer works ok, but leaves should be spread out flat in layers.

You can do these in a dehydrator, but since I don't have one, I put the oven on its lowest setting (for my oven that's 175 F). You can also bake these at a higher temp, as I've seen in some recipes, but the risk of burning increases with the temp. Dry for 6-10 hours, or until chips are fully dry and crispy. They should crack when you touch them.

Wednesday, August 8, 2012

Green Tomato and Swiss Chard Sauté with Basic Tofu Scramble

Basic Tofu Scramble

• 2 tsp canola oil
• 1/2 block medium or firm tofu
• 3 tbsp nutritional yeast (or to taste)
• 1/4 tsp Montreal steak spice (optional, alternately, add a pinch of salt)

Mash tofu in bowl. Mix in nutritional yeast and spice. Fry in canola oil on medium high heat until any liquid has boiled off.

Green Tomato and Swiss Chard Sauté

• 2 tsp canola oil
• 6 large washed leaves swiss chard
• one large green or partly green tomato
• 2 cloves garlic
• splash of balsamic vinegar
• pinch of salt


Cube the green tomato. Begin to fry in the canola oil, stirring periodically. While the tomato is frying, finely chop the garlic. When the garlic is chopped, add it to the tomato. Roughly cut up the swiss chard (including stems) and once the tomatoes are starting to crisp/brown on the outside, add in the chard and the splash of balsamic. Continue cooking until the chard is fully wilted/shrunken.


Wednesday, August 1, 2012

(Sugar Free) Vegan Peanut Butter Chocolate Ice "Cream"

This is my own recipe that I winged after reading a couple recipes for chocolate peanut butter ice cream (both vegan and non-vegan).

2 cups chocolate soy or almond milk*
3/4 cup natural peanut butter
1 cup pitted whole dates
heaping 1/4 cup cocoa powder
1/4 cup whole red skin peanuts

Put everything in blender. Blend, moving from low to high speed, until everything is smooth and creamy. Chill for at least 1 hour. Put into prepared ice cream maker according to manufacturer's directions. In my ice cream maker, it took about 15 minutes to be done because the mixture was quite thick. When it was done, it came out a perfect soft serve consistency, ready to eat. This is richly flavoured, deliciously fudgey in texture, and would go great with brownies. (Maybe add brownie chunks next time!?)


*I use commercially made, or a mix of commercially made and home made. I have discovered home made milks do not do as well in ice creams. Ice creams made with home made milks seem to form ice crystals so the texture is more like a sorbet than ice cream (not as creamy!) I think that ice cream benefits from the emulsifiers/thickeners they put in commercial vegan milks. I am going to try to get my hands on some xanthan gum to use as a thickener/emulsifier in my vegan ice creams.

This is NOT sugar free unless you use unsweetened soy/almond milk.